My dream old junkyard lancer evo engine rebuilt

peterj

1,000 RPM
Senior Member
Thread starter
Apr 27, 2010
1,321
258
1,683
Kuching
finally after long waiting the block gone in machine shop to rebore and rehone according to the cp spec sheet is back after 1.5 weeks,even the machine guy say the rebore is bigger then the normal job they had done according to the spec sheet,so prepare for some clock clock sound while cold start:biggrin:

not a perfect job but i think is up to standard, not perfect cause they only use one piston to measure and rebore the block, not like semenanjung so pro using all 4 piston to measure and label later which piston is in which liner.. what to do, me here is little ulu as compare to semenanjung, but we are not live on tree ha...:biggrin:

20141001_150518.jpg


so the phase 2 of the job,reinstall has begun , hope it can come to phase 3 soon, the running in:rolleyes:
 

pangyau

1,000 RPM
Senior Member
Oct 17, 2009
1,153
302
1,683
Malaysia
peterj,
My place also ulu + pedalaman + less people.
You need to instruct the machine shop as per your requirement.
Then, you might get it correctly.

After all nice project. Good luck bro...
 

peterj

1,000 RPM
Senior Member
Thread starter
Apr 27, 2010
1,321
258
1,683
Kuching
I assume the diff is minimal for this kind of expensive and branded piston,just dont too much till eating my oil and smoke coming out from zorst then gud....but mostly ppl doing rebore here all using one piston only lmfao
 

peterj

1,000 RPM
Senior Member
Thread starter
Apr 27, 2010
1,321
258
1,683
Kuching
the progress are really slow, since this is the first time i experience some sort of engine rebuilt with "standard".. previously crankshaft just torque directly with torque wrench and the old mechanic feels it with hands while turning, this time the bearings all fit according to the plastic gauge and studs are torque according to the mitsu 4g63 manual....

start with insert the big end bearings
20141002_110303.jpg

torque the shiny crankshaft with plastic gauge inserted for bearing fittings,bit complicated process i not really remember since i not there every minutes, heard is torque step by step with small torque then higher torque , then loosen up then tighten again,then spin the crankshaft then open again to check the plastic gauge
20141002_110636.jpg

20141002_112517.jpg

opened up and checked clearance cun,all big end bearings share the same clearance (0.05mm) then install back with amsoil assembly lube, still can see the mark of plastic gauge on the 5th photo
20141002_140315.jpg

20141002_140426.jpg

lastly torque according to mitsu manual, 20nm +- 2 , then add a 90 degree torque ,seriously this is the 1st time i see ppl use this so called degree torque stuff, lol.. i am to ulu then, do engine all by hands :biggrin:
20141002_141814.jpg

then there goes the works for today, since the mech wait his degree torque meter to arrive waited 2 hours:biggrin:

will not able to go see see these few days, hopefully when he install the conrod and piston he will remember i ask him to take pictures:idea:
 

peterj

1,000 RPM
Senior Member
Thread starter
Apr 27, 2010
1,321
258
1,683
Kuching
The internals of an engine is the sexiest part of the car. Yum.
i personally think felixia yeap is more sexy:love:

btw the work is real slow, if previous time, the engine i think already in for run in.. lol... lower standard built btw..:nurse:
 

peterj

1,000 RPM
Senior Member
Thread starter
Apr 27, 2010
1,321
258
1,683
Kuching
hopefully the thread in zth still contain the old sweet memories will not be deleted:biggrin:
 

peterj

1,000 RPM
Senior Member
Thread starter
Apr 27, 2010
1,321
258
1,683
Kuching
for got to say also, need to thanks a lot to zerotohundred.com, there are reasons i stay up lates and browse the same site,one of it is sometimes i will get surprise, like this one , the ori hks cam pulley for e1-3

mmexport1412268909542.jpg

find till die months ago, no 2nd hand to find since ppl sells together with cams, then got one set asked from singapore quote me 1.4k brand new with postage... then i keep my mind to be low budget then think of get aerospeed or works pulley from fren and turn degree wheels to tune the cams again(complicated and time consuming), but finally ZTH give me a surprise while i surf for the markerplace and the pulley shows up, and it is ori:biggrin: with this it ease a lot of the cams adjustment since my mech got all the specs written down on how to tune the cams with ori hks pulley.... can simply dial in without degree wheels:idea:
 

peterj

1,000 RPM
Senior Member
Thread starter
Apr 27, 2010
1,321
258
1,683
Kuching
a proper or up to standard built is not that easy, after so long then now the mech put the forgies in, but shits are always happen:bawling:
20141006_100241.jpg

20141007_154105.jpg

20141007_154125.jpg
same job here, torque following spec, and everything seems shiny and nice until we turn the crank, it is damn tight, we expect it will be gud since while we fit the crank the gap looks gud so we did not test the conrod cap but now so tight to turn, nvm, open conrod cap and check with plastic gauge, , it shows 1st and 4th is still inside the range (0.015"- 0.03") even it shows some imbalance , but the 2nd and 3rd show over imbalance or too wide the gap, then i learn something new, switch the bearing from different conrod and see

but at first the mech go direct switch cap,

switched cap
20141007_155029.jpg


torque to spec
20141007_155315.jpg

good and balance clearance
20141007_160131.jpg

then the plastic gauge show balance and proper gap for the 2nd and 3rd, and the crank turn smoothly, however the method is wrong, we cant just switch the cap from the diff conrod, so we switch back the cap again but retain the switched bearing, the 3rd shows good clearance but still the 2nd are too wide and imbalance gap, since the 1st conrod also got some imbalance,we switch it with the 2nd, then the 1st shows good and more balance clearance, but still the 2nd conrod still fuck up, but then, it is already 5.30pm, then, i need wait tomorow the mech to switch the 2nd and the 4th bearing and see how, if cant then there will be unfinished switching, really need switch the upper bearing of each of the conrod which consume lots of time, now i know a proper built engine procedure is that hard:hmmmm: but at least i learn new thing on the switching of bearing, and i wonder why the acl bearing dont have colour code matching to ease the job btw:hmmmm:
 

peterj

1,000 RPM
Senior Member
Thread starter
Apr 27, 2010
1,321
258
1,683
Kuching
it had been week plus since last update, quite lots of work done by me and my mech in this duration... let the pics and stories begin:biggrin:

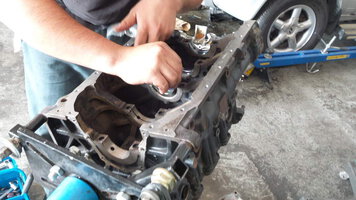
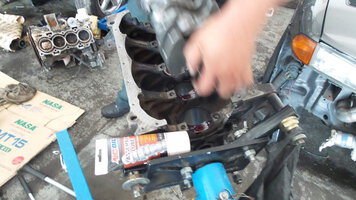
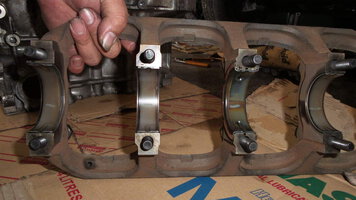
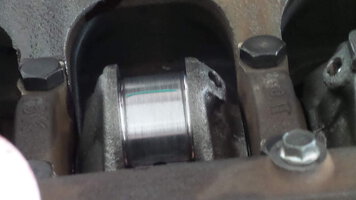
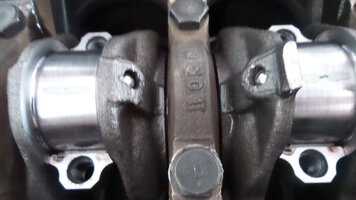
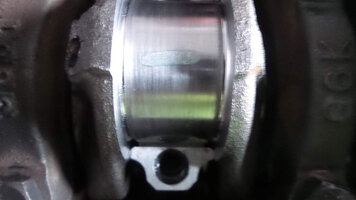
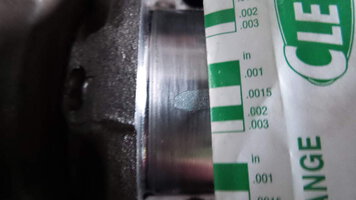
the mech actually quite sien with the bearing fitting already, he not only change the conrod bearing and test with plastic gauge to get the best clearance, but took out independent rods and piston and put to different bore and test, but result still disappointing, the 2nd conrod bearing still shows unbalances clearance and over wide clearance.. so he stop after switch the rods and piston with another bore.. then, i saw he no work, then i tangan gatal go take all the tools he used and do what he do,put plastic gauge and torque to spec with torque wrench.. magically, this is the result.:biggrin:

20141010_170518.jpg

20141010_170605.jpg
seems like my engine like me to touch it:biggrin:

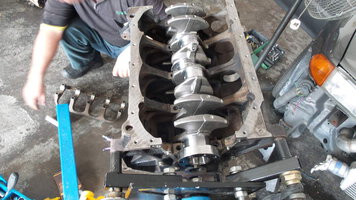
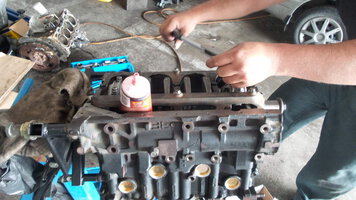
ok, the 1 week headache problem solved, now the mech start to reassemble things back... first the oil sump parts

20141011_154718.jpg

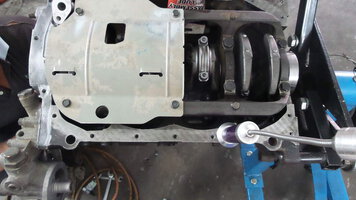
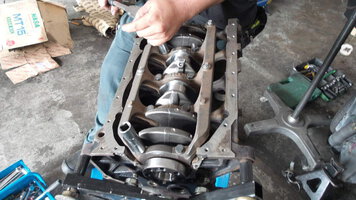
then putting in the ARP "piling"

20141011_170734.jpg

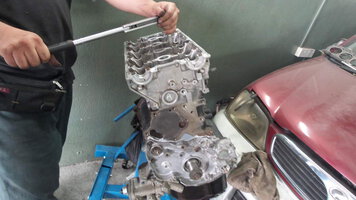
then the head is in, with arp , it actually required special size and special tools,we all thought it is a 13mm nuts so i gound a short socket to use, howver, during the torque process (torque according to oem manual,70nm > 0 > 20nm > 90 degree x 2) , the socket slide off twice and hurt the nut little, and then we figure out the socket is too short and keep obstructed by other stuff in the head so cant have a tight fit.. and also my fren(a mech and experience in motorsport) tole me it is "angmo size" 1/2 not 13mm.. so i rush to buy a long socket sized 1/2.. then they finally torque it down properly:nurse:

20141013_143241.jpg

20141013_143959.jpg

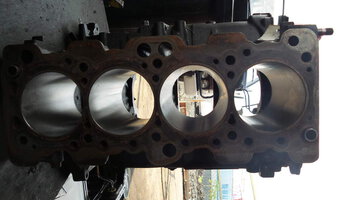
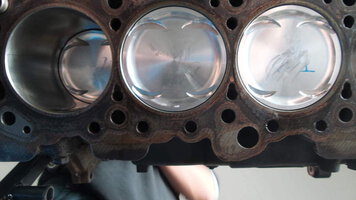
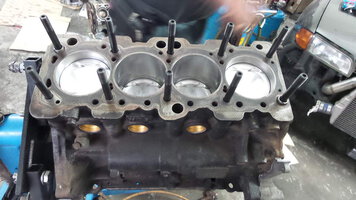
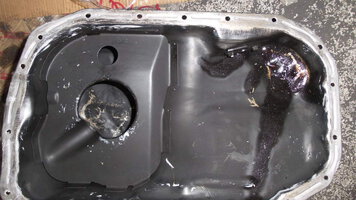
sun up sun down, another day, today i feel free to brush and spray black my oil sump, but sorry no actual pic of it.. so i just put my oil sump pic, and i do discover mitsubishi really do effort on their engine, it come originally a buffered oil sump... and it remind me once upon a time how hard i search for buffer plates for my honda engines:thefinger:

20141015_115139.jpg

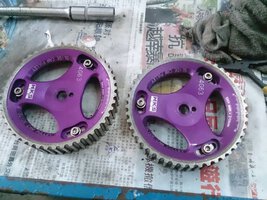
then i took all the cams and trinity clutch to be rdy to install(no budget so use cheap clutch:biggrin:),meanwhile, a new water pump is installed

20141016_090121.jpg

20141016_092421.jpg


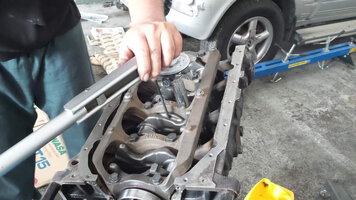
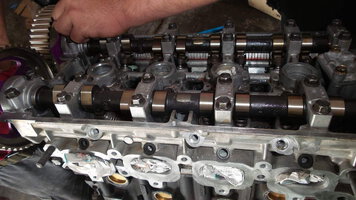
then the mech install the cams and cam pulleys, same, bearing caps torque to specs then turn using hand to test for smooth turning (lifter and rocker arm not installed)

20141016_105733.jpg

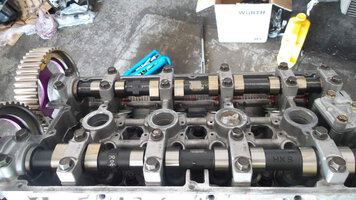
when mech thought all run smoothly, then something weird happen, when wanna install timing belt, discovered the 1st piston stuck with valve ,why?? all according to the campulley and crank mark.... we all no answer, i thought i got fake pulley or the crank gear timing mark gone wrong, then again i ask for help from my fren that pro in motorsport since his workshop beside only:biggrin: once he came here and see, one funny and simple mistake occur, intake and exhaust cam installed terbalik:biggrin::biggrin: but we had install according to the sticker stick on the package, which mean the supplier opened the package and put back wrongly:thefinger: nvm, we redo the all progress again, then everything done...

20141016_133000.jpg

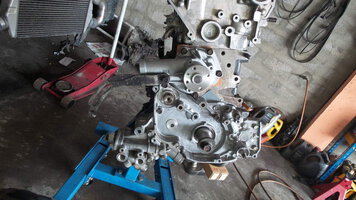
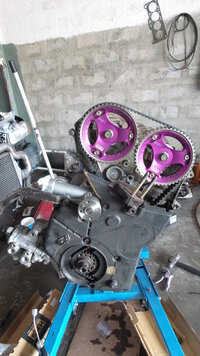
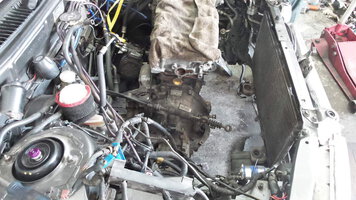
then the engine's part mostly done with the timing belt installed...

20141016_171215.jpg

then it is the transmission, but it is quite simple, new trinity clutch kit, new clutch bearing,stick the gearbox in, done... some thing hard to do is that we forgot we need install the middle cross member first before install back the mid differential, we think of other way round, nvm, same thing, re do it again:smokin:....now the engine with all things are in the engine bay again,wait all other parts installed back,maybe i can finally hear the engine sound i did not heard for months next week:rolleyes::driver:(actually more things already in the engine bay but i forgot to take the pic) .. however, i still need find new engine side engine mount cause i found all other three mounts but not that one here (pity kampung area people):banghead:

20141017_105220.jpg

20141017_161316.jpg

it almost done,stay tuned:biggrin:
 
Last edited:

Random Post Every 5 Minutes

:( just wanna know whether satria 1.6 and wira 1.5 can use the same set of springs....
coz my fren's driving a wira 1.5 and wanna sell his sport springs... so can i use it?
Ask a question, start a discussion or post something for sale!
Post thread

Online now

Enjoying Zerotohundred?

Log-in for an ad-less experience