eohl79
Known Member
Here is my first amateur headlight restoration job. Never really did any real restoration before as I always used Megs Platx previously which can't do much correction.
Subject is a P.Saga headlights which has some slight yellowing, hazy, minor scratches/RIDS, pits. This is the same P.Saga in which I've reviewed CarPro TarX before in AW forum.
CarPro TarX Usage

Figure 1: Dull left headlights

Figure 2: Dull left headlights under inspection lamp

Figure 3: Left headlights, zoomed in with visible RIDS and scratches besides the dull faded surface
Mission of the day is to restore the clarity of the headlights and the second the level out some minor RIDS and surface imperfection. The products that I've chosen are:
1. Osren P40 + Osren spot buff denim pad, Makita speed 1->2->1. This is as an alternative to manual wet sanding of the surface to remove minor imperfection. Tried with velvet pad before but find the cut too slow, hence used denim pads instead.
2. Osren P40 + LC spot buff wool pad, Makita speed 1->2->1. This is to remove the swirl sanding marks left over from the denim pad.
3. Optimum polish II + LC white spot buff foam, Makita speed 1->2->1. This is to remove the haziness from the P40 compound from denim and wool pad.
I chose Osren P40 compound as it has some serious cutting abilities and seems to be of diminishing abrasives. Initial cut seems more than Optimum compound II - it feels more gritty. Osren latest spot buff denim pad (version 3.0 which is thicker and does not require an interface pad) chosen as it has the highest cutting ability (somewhere around 1000 grit) will save me some precious time instead of doing manual wetsanding which is a tedious and time consuming job. My main aim to the headlight job is to use the minimal amount of products, steps and achieve a reasonable but not perfect finish.

Figure 4: Remedy for the day, Osren P40 with Osren spot buff denim and velvet pads (did not use this)

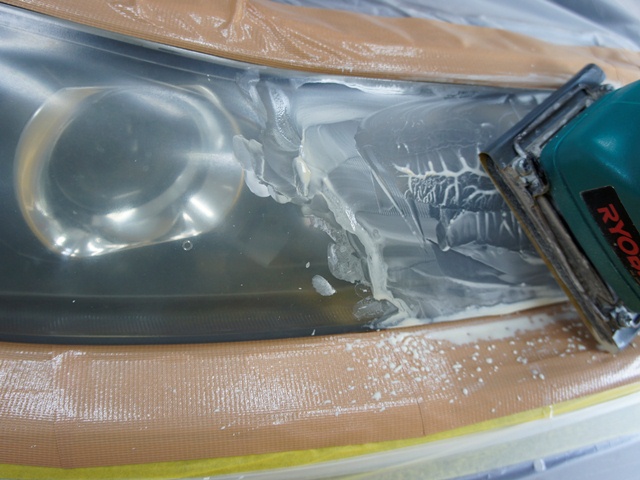
Figure 5: Right uncorrected, center denim+P40, left denim+P40 and LC white+Opti Polish II. There are still some sanding mark swirls in the center which I could not remove with the polishing step. Followed on later with wool before polishing.

Figure 6: After P40+denim, P40+wool, LC white+Opti Polish II. Clarity restored, light scratches removed.
On to the right headlights.

Figure 7: Right headlight after P40+denim, most surface imperfection removed except for micro cracks and deeper surface imperfection

Figure 8: Right headlight after P40+wool, sanding marks removed

Figure 9: Right headlight after LC white+Opti Polish II. Not as clear as left headlight. There are some micro cracks and surface defects which I did not do any correction as it would need some serious surface leveling which I am not keen

Figure 10: Right headlight all complete. Not as good as left headlight but owner is satisfied enough as he just wanted to get rid of the yellowing and haziness.
Lastly, cleaned both headlights surface thoroughly with denatured alcohol before giving it a coat of OC2.0. Let's see how long OC2.0 lasts on the headlamp.
Conclusion:
1. Osren P40 + spot buff denim pad with a rotary at low speed does achieve somewhat of a similar method to sanding the headlights with a 1000 grit sandpaper. There are definitely some rotary swirl marks after using it which can be removed easily by a wool pad.
2. If the headlamp surface is inspected on closeup, there are still some unevenness to the surface. Might need a coarser sandpaper in the range of 500 or 800 grit to level it out. Did not do so as I want to minimize the steps and not the finish that I wanted to achieve with this headlights - plastic is thin and and further leveling would make the plastic more fragile, no point doing so. This is an everyday driver.
3. There are some clouding and dirt behind the headlights. Not sure where it came from. Probably from the bulb opening or the seal surrounding the clear case perimeter isn't tight. Will get to that another day.
4. Total time taken, less than 2 hours to complete both headlights, take picture, test spot, etc.
5. Don't use cotton applicator or MF towel to apply OC2.0 on headlights! Tried using those stuff and it generates static once you rub it over the plastic surface thereby attracting lint/dirt! Need to use sponge applicator instead as it is lint free. Could also do with a coat of sealant instead like Opti-seal.
6. I might want to try Osren range of polish instead of Optimum Polish II next time as it is easier to source locally. BTW, Osren compound and polishes are definitely easier to clean with just water alone.
7. I am happy, owner is happy
Do drop feedback or comment on what I can improve on. TQ very much for viewing. Now to go enjoy some CNY cookies...
Subject is a P.Saga headlights which has some slight yellowing, hazy, minor scratches/RIDS, pits. This is the same P.Saga in which I've reviewed CarPro TarX before in AW forum.
CarPro TarX Usage
Figure 1: Dull left headlights
Figure 2: Dull left headlights under inspection lamp
Figure 3: Left headlights, zoomed in with visible RIDS and scratches besides the dull faded surface
Mission of the day is to restore the clarity of the headlights and the second the level out some minor RIDS and surface imperfection. The products that I've chosen are:
1. Osren P40 + Osren spot buff denim pad, Makita speed 1->2->1. This is as an alternative to manual wet sanding of the surface to remove minor imperfection. Tried with velvet pad before but find the cut too slow, hence used denim pads instead.
2. Osren P40 + LC spot buff wool pad, Makita speed 1->2->1. This is to remove the swirl sanding marks left over from the denim pad.
3. Optimum polish II + LC white spot buff foam, Makita speed 1->2->1. This is to remove the haziness from the P40 compound from denim and wool pad.
I chose Osren P40 compound as it has some serious cutting abilities and seems to be of diminishing abrasives. Initial cut seems more than Optimum compound II - it feels more gritty. Osren latest spot buff denim pad (version 3.0 which is thicker and does not require an interface pad) chosen as it has the highest cutting ability (somewhere around 1000 grit) will save me some precious time instead of doing manual wetsanding which is a tedious and time consuming job. My main aim to the headlight job is to use the minimal amount of products, steps and achieve a reasonable but not perfect finish.
Figure 4: Remedy for the day, Osren P40 with Osren spot buff denim and velvet pads (did not use this)
Figure 5: Right uncorrected, center denim+P40, left denim+P40 and LC white+Opti Polish II. There are still some sanding mark swirls in the center which I could not remove with the polishing step. Followed on later with wool before polishing.
Figure 6: After P40+denim, P40+wool, LC white+Opti Polish II. Clarity restored, light scratches removed.
On to the right headlights.
Figure 7: Right headlight after P40+denim, most surface imperfection removed except for micro cracks and deeper surface imperfection
Figure 8: Right headlight after P40+wool, sanding marks removed
Figure 9: Right headlight after LC white+Opti Polish II. Not as clear as left headlight. There are some micro cracks and surface defects which I did not do any correction as it would need some serious surface leveling which I am not keen
Figure 10: Right headlight all complete. Not as good as left headlight but owner is satisfied enough as he just wanted to get rid of the yellowing and haziness.
Lastly, cleaned both headlights surface thoroughly with denatured alcohol before giving it a coat of OC2.0. Let's see how long OC2.0 lasts on the headlamp.
Conclusion:
1. Osren P40 + spot buff denim pad with a rotary at low speed does achieve somewhat of a similar method to sanding the headlights with a 1000 grit sandpaper. There are definitely some rotary swirl marks after using it which can be removed easily by a wool pad.
2. If the headlamp surface is inspected on closeup, there are still some unevenness to the surface. Might need a coarser sandpaper in the range of 500 or 800 grit to level it out. Did not do so as I want to minimize the steps and not the finish that I wanted to achieve with this headlights - plastic is thin and and further leveling would make the plastic more fragile, no point doing so. This is an everyday driver.
3. There are some clouding and dirt behind the headlights. Not sure where it came from. Probably from the bulb opening or the seal surrounding the clear case perimeter isn't tight. Will get to that another day.
4. Total time taken, less than 2 hours to complete both headlights, take picture, test spot, etc.
5. Don't use cotton applicator or MF towel to apply OC2.0 on headlights! Tried using those stuff and it generates static once you rub it over the plastic surface thereby attracting lint/dirt! Need to use sponge applicator instead as it is lint free. Could also do with a coat of sealant instead like Opti-seal.
6. I might want to try Osren range of polish instead of Optimum Polish II next time as it is easier to source locally. BTW, Osren compound and polishes are definitely easier to clean with just water alone.
7. I am happy, owner is happy
Do drop feedback or comment on what I can improve on. TQ very much for viewing. Now to go enjoy some CNY cookies...